Layers of whipped cream and whole Oreos that transform overnight in the fridge into a soft, sliceable cake. Five ingredients, zero baking, completely addictive.
This no-bake Oreo icebox cake might be the most satisfying dessert on this entire list, purely because of what happens to it overnight in the fridge. You put in a dish of layers of whipped cream and whole, completely crunchy Oreo biscuits. You come back eight hours later and somehow those biscuits have become soft, almost spongy, like layers of proper cake. It feels like a magic trick. And with five ingredients and twenty minutes of effort, it might just be the easiest impressive dessert you will ever make.
WHY YOU’LL LOVE THIS RECIPE
The transformation that takes place overnight genuinely surprises people every time. Nobody believes that whole biscuits became soft and cake-like until they taste it themselves. It is also a brilliant recipe for children to help with because there is no heat involved and the layering step is genuinely fun.
WHY IT WORKS
As the cake sits in the fridge overnight, moisture from the whipped cream is gradually absorbed into the dry Oreo layers. The cream provides just the right amount of water content to soften the biscuits to a cake-like texture without making them soggy or collapsing. This transformation only works with properly whipped cream. Custard, frosting, or single cream will not produce the same result.
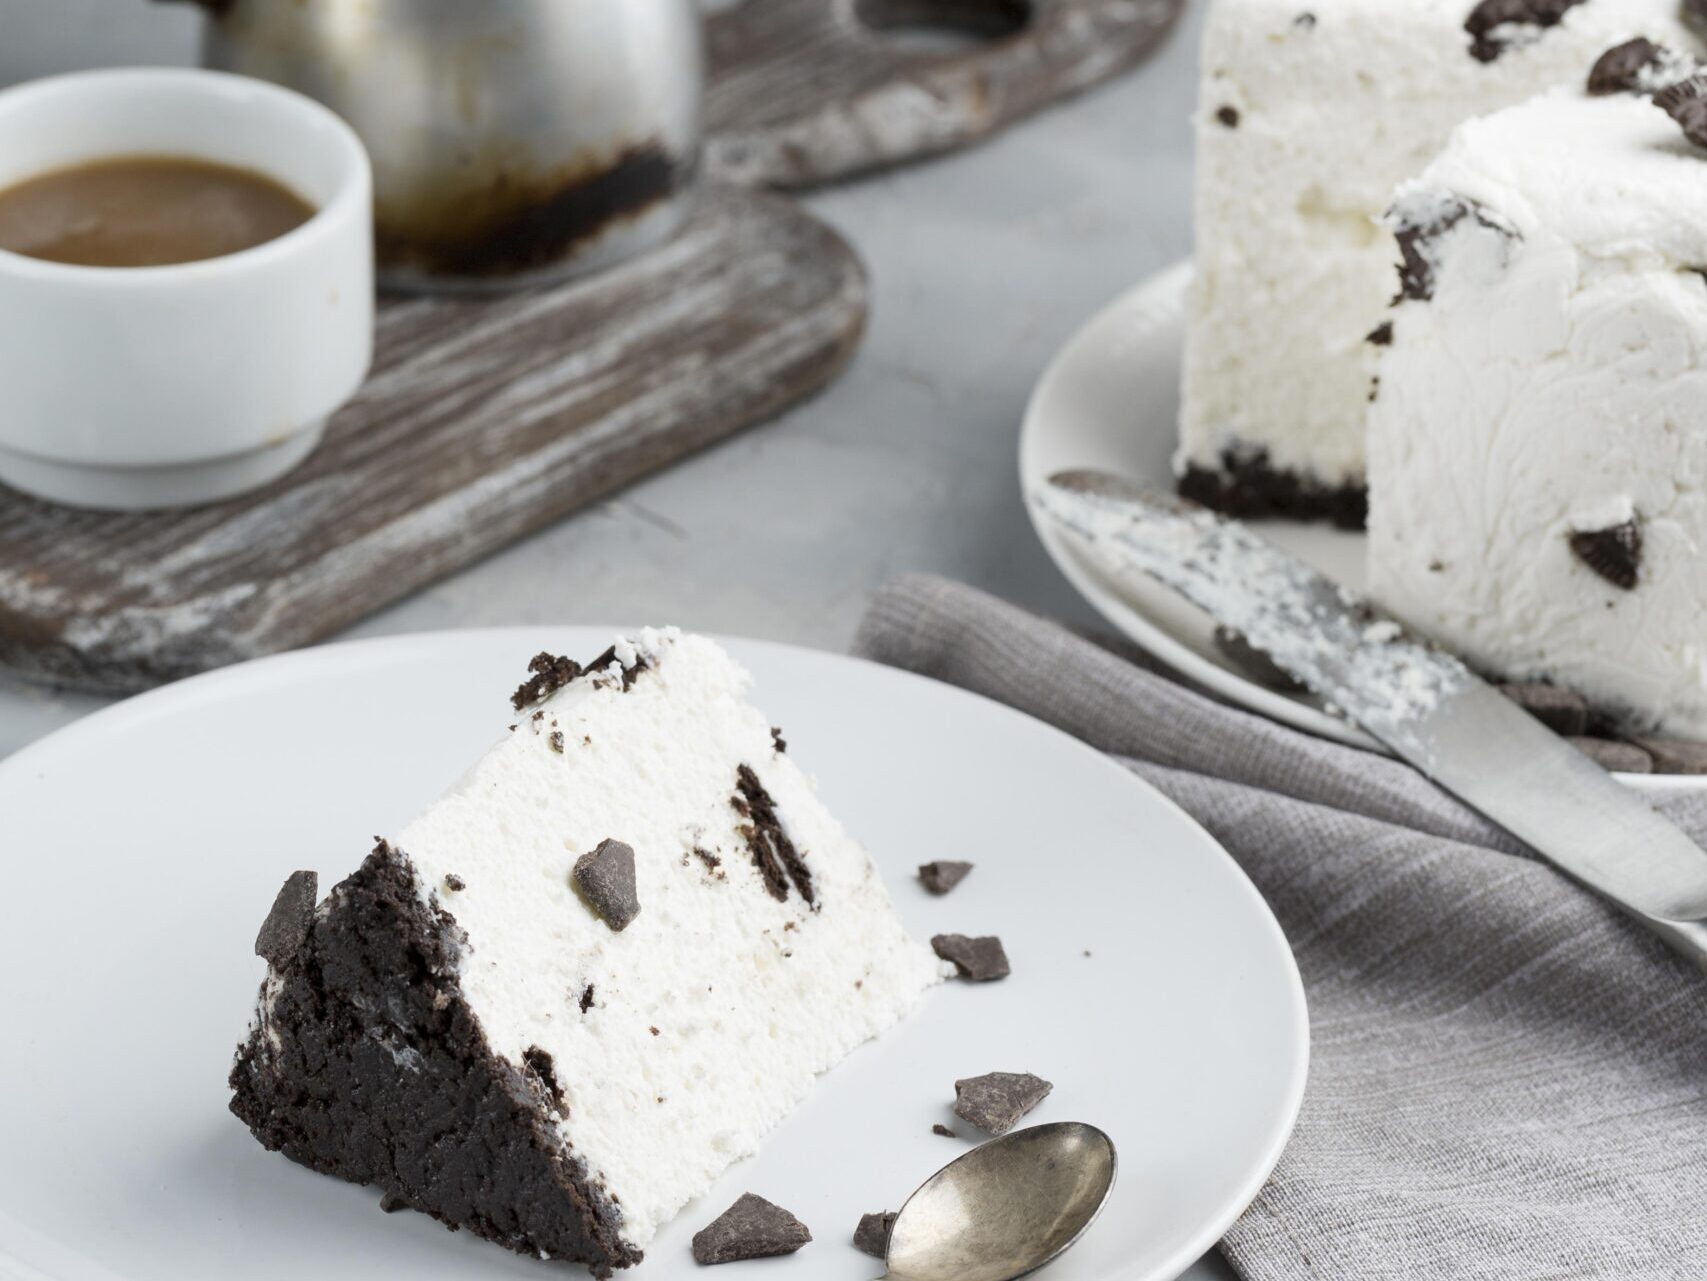
No-Bake Oreo Icebox Cake

WholeOreos and whipped cream layered up and left overnight. By morning those crunchybiscuits have transformed into soft, cake-like layers that slice beautifully.Five ingredients, zero baking, completely magical.
Ingredients
- 600ml double cream
- 3 tablespoons icing sugar, sifted
- 1 teaspoon vanilla extract
- 400g Oreos (approximately 40 cookies)
- 50g dark chocolate, finely grated or shaved, to finish
Instructions
Step 1 Whip the cream
Pour the double cream into a large, clean mixing bowl. Add the sifted icing sugar
and the vanilla extract. Begin whipping on medium speed and gradually increase
to medium-high. You are looking for the cream to reach firm peaks. This means
that when you lift the beaters, the cream holds a stiff peak that stands
upright and does not flop over. This usually takes about 3 to 4 minutes
depending on your mixer. It is important to get this right. Under-whipped cream
that is still quite soft will not support the weight of the Oreo layers above
it and the cake will be too wet and unstable. Equally, do not overwhip. If the
cream starts to look grainy or yellowish, you have gone too far and it will not
spread smoothly. Stop as soon as you have firm, glossy, spreadable peaks.
Step 2 Start layering: cream first
Spoon a thin layer of the whipped cream across the base of your serving dish. Spread
it evenly to cover the entire base right to the edges. This thin bottom layer
of cream is what anchors the first row of Oreos and stops them sliding around
when you try to lay them down. Without it, the biscuits have nothing to grip
onto and the layers above tend to shift.
Step 3 Add the first layer of Oreos
Lay the Oreos in a single, snug layer directly onto the cream base. Fit them as
close together as possible without overlapping them. You want to cover as much
of the cream surface as you can so that when it is sliced every portion has an
even amount of biscuit running through it. If there are gaps around the edges
that whole Oreos will not fit into, break some Oreos in half and use those to
fill the spaces. One flat, even layer is what you are going for.
Step 4 Repeat the layers
Spread a generous, even layer of whipped cream over the Oreos. Make sure you get the
cream into all the gaps between the biscuits and right to the edges of the
dish. Then add another single layer of Oreos on top of that cream, following
the same pattern as before. Repeat this process of cream then biscuits until
you have used up all your Oreos, making sure you always have enough cream left
to finish with a cream layer on top. The final top layer should be cream,
spread as smoothly as you can manage. Press the last row of Oreos gently into
the top cream layer as a decoration if you like, or simply leave it as a smooth
cream surface for the grated chocolate to go onto.
Step 5 Chill overnight and finish
Cover the dish tightly with cling film and place it carefully in the fridge. Leave it
completely undisturbed for a minimum of 8 hours. Overnight is perfect. The full
overnight rest is what allows the transformation to happen. Do not be tempted
to check it after 4 hours because the Oreos will still be largely crunchy at
that point and you will be disappointed. Trust the process. When you are ready
to serve, take the dish out of the fridge and scatter the finely grated or
shaved dark chocolate generously over the entire surface. Slice it into squares
or rectangles directly in the dish and serve.
Notes
The overnight chill is genuinely essential. Four or five hours is not enough time
for the Oreos to fully absorb the moisture from the cream and soften all the
way through to a cake-like texture. Eight hours is the minimum and if you can
leave it for a full 12 to 14 hours, the result is even better. Also make sure
you get the cream to proper firm peaks before layering. Soft, loosely whipped
cream cannot support the layers above it and the whole thing becomes wet and
unstable.
Nutrition Information:
Yield:
12Serving Size:
12Amount Per Serving:Calories: 420ckalTotal Fat: 28gSaturated Fat: 16gSodium: 290mg
VARIATIONS
Use flavoured Oreo varieties for a completely different flavour profile. Mint Oreos with the standard whipped cream makes a wonderful mint chocolate icebox cake. You can also stir a tablespoon of instant espresso powder into the cream before whipping for a mocha version that is absolutely delicious. Crushed Oreos mixed into a thin layer of cream cheese makes a lovely cheesecake-style variation if you want something richer.
SUBSTITUTIONS
Heavy whipping cream works as a direct substitute for double cream. Any chocolate sandwich biscuit can replace Oreos. Bourbon biscuits or chocolate-coated digestives work particularly well and give slightly different flavour notes.
COMMON MISTAKES TO AVOID
Not chilling long enough is by far the most common issue with this recipe. The biscuits will still be crunchy after less than 8 hours and the cake will not slice cleanly or hold together. The second most common mistake is overwhipping the cream. If the cream turns grainy or starts to look like it is breaking, it has gone past the point of no return. Unfortunately you cannot rescue over-whipped cream. Start again with fresh cream.
SERVING SUGGESTIONS
Serve straight from the dish in squares or rectangles. A light dusting of good quality cocoa powder or extra crushed Oreos sprinkled over the surface just before serving looks wonderful. It is also very good served with a scoop of vanilla ice cream alongside if you want to make it extra indulgent.
STORAGE
Store covered in the fridge for up to 3 days. It is genuinely at its absolute best on day two when the biscuits have had the full time to soften completely. This cake can also be frozen and transforms into something resembling an ice cream cake, which is excellent. Thaw for 20 to 30 minutes before serving.
FAQS
Can I add different flavours to the cream?
Absolutely. You can fold anything you like into the cream before layering. Instant espresso powder, cocoa powder, peppermint extract, almond extract, and even a spoonful of good quality jam all work brilliantly. Just add your flavouring along with the icing sugar before whipping.
Can I freeze it?
Yes, it freezes really well. Wrap the dish tightly in cling film and then in foil and freeze for up to one month. When frozen, it has the texture of an ice cream cake which is genuinely delicious. Thaw it in the fridge for a couple of hours or on the counter for 20 to 30 minutes before serving.
What if I cannot find a dish big enough for all the Oreos?
Use whatever dish you have and adjust the number of layers accordingly. A deeper, smaller dish will give you more layers but fewer portions across. A wider, shallower dish will give you fewer, flatter layers but more surface area to cut from.